Developed By:

Developed By:

Thursday, July 17, 2008

Avoid latency while editing remote files using bcvi

The ability to run both console and graphical programs securely on a remote system using SSH brings you a great deal of freedom. When the communications link to that remote system has high latency, however, running interactive programs such as a text editor on the remote machine can become a real test of your patience. The bcvi project lets you edit files on a remote system using gvim (or another editor) on your local desktop machine to avoid the latency. Even without latency issues, bcvi is a handy tool when you want to use gvim to edit a file on a server that does not have gvim or the X libraries installed.

bcvi works by creating a port-forwarding "back-channel" when you connect to a remote system with SSH. On the remote system, when you execute bcvi, it uses this back-channel to tell your desktop machine to start gvim and fetch the file you want to edit on the remote machine. This all relies on gvim supporting SSH URIs so it can download the file from the remote machine over SSH and put it back again once you are done editing.

There are no packages of bcvi for openSUSE, Fedora, or Ubuntu. The bcvi script is presented inline on its home page, and can also be downloaded. The bcvi script must be installed on both the client and server machines, which you can do with the following commands:


# cp /.../bcvi /usr/local/bin/
# chmod 755 /usr/local/bin/bcvi
# dos2unix /usr/local/bin/bcvi
# ls -lh /usr/local/bin/bcvi
-rwxr-xr-x 1 root root 8.2K 2008-06-23 14:59 /usr/local/bin/bcvi*

The same bcvi script is used in three contexts: a daemon process that invokes gvim on your desktop machine in response to editing requests that you start on remote hosts; to wrap the invocation of SSH, setting up additional port forwarding so bcvi on the remote system can talk to the bcvi daemon process on your desktop machine; and on remote systems to initiate an edit request on your desktop machine.

When you SSH into a remote machine with bcvi the TERM environment variable has additional information added to it so bcvi on the remote machine can work out how to talk to your desktop machine. On the remote machine you will most likely want to add the following two lines to your shell's ~/.profile file. The first line lets bcvi take its information out of the TERM environment variable, leaving TERM the way it would normally be set. The second line makes typing vi on the remote machine execute bcvi, which will open gvim on your local machine. On most Linux systems, bash is the default shell, so the file to edit is ~/.bash_profile.


test -n "$(which bcvi)" && eval "$(bcvi --unpack-term)"
alias vi=bcvi

You also need to ensure that bcvi is running as a daemon on your desktop machine so that when you execute bcvi on the remote machine it can communicate with the local bcvi daemon to open the file for editing. You can start the daemon automatically by adding the following line to your ~/.bash_profile:


bcvi -l &

Instead of having to remember to wrap your SSH invocations with bcvi, you can use a shell alias on your desktop machine to wrap all connections, as in the code below. I found that if I added the alias to ~/.bash_profile instead of ~/.bashrc it did not take effect when logging in to a local X window session -- so although adding the code to the .bashrc means it is executed every time you create a shell, you are guaranteed that the alias will be in effect all the time.


alias ssh="bcvi --wrap-ssh --"

With these modifications to the .bash_profile file on your desktop machine and the servers you are connecting to, you can edit files as shown below. Because you have set up vi as a shell alias to bcvi, you don't have to change your command line at all in order to edit a file on the remote system with gvim on your desktop machine. The screenshot includes this interaction, where I have also saved the file and executed cat on the remote machine to verify that the updates were saved.


[ben@virtual_client ~]$ ssh ben@virtual_server
[ben@virtual_server ~]$ date >bcvi-test-file.txt
[ben@virtual_server ~]$ vi bcvi-test-file.txt
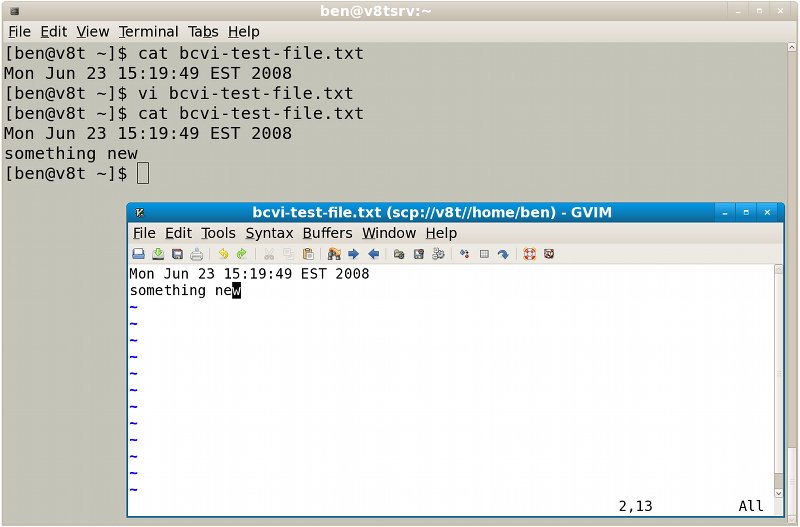
bcvi

You can use a text editor other than gvim with bcvi as long as the text editor you want to use can load and save files over SSH. For instance, the gedit text editor can load and save over SSH:// URIs. To allow bcvi to edit using gedit, you need to add the following procedure to the bcvi Perl script, perhaps just after the execute_vi function.


sub execute_gedit {
my($self, $alias, @files) = @_;

s{^}{ssh://$alias/} foreach @files;

system('gedit', '--', @files);
}

With the above new function in bcvi, you can execute the following command on the remote host to have gedit run on your desktop machine and load the specified file. If you like this, you can add the gedit alias to the ~/.bashrc file on the remote host to allow such editing without having to remember to change the command line.


bcvi --command gedit bcvi-test-file.txt
alias gedit="bcvi --command gedit"

If you use bcvi to connect to a machine but do not include the bcvi --unpack-term command in the startup files for the remove shell (~/.bash_profile as shown above) then you will get an annoying debug message when you exit your SSH connection, as shown below:


$ ssh root@virtual_server
Last login: Mon Jun 23 15:16:13 2008 from virtual_client
[root@virtual_server ~]#
[root@virtual_server ~]# exit
logout
'xterm
BCVI_CONF=virtual_server:localhost:5009': unknown terminal type.
Connection to virtual_server closed.

bcvi is a handy tool to know about if you maintain a system over a high-latency network link. If the file you are editing is only a few kilobytes large but the round-trip latency makes even moving the cursor painfully slow, bcvi should make for a quicker, frustration-free edit.

Monday, July 14, 2008

Maemo 4.1 bring mail and packaging improvements to Nokia's Linux-based tablets

Nokia released version 4.1 of it's Linux-based Internet Tablet platform Maemo last month. 4.1 is a minor update to the operating system, but it boasts two important features that answer long-held complaints: an improved open source email client, and migration to a package updating system more like that of a desktop Linux distribution.

Tablet owners can download the update for N800 and N810 devices by visiting tablets-dev.nokia.com. As with previous releases, a valid device ID is required to download a firmware image. Upgraders can make a backup of their settings onto one of their tablet's memory cards, including a list of installed applications, which can be automatically reinstalled following the update.

The end of flashing

The upgrade process involves flashing the new firmware over the device's existing installation, as it has since the debut of the Maemo-based tablets. But 4.1 is the last release to require such a headache. Future updates to individual system components will be made available as package upgrades, just as is done for user applications.

Re-flashing the tablet's firmware is not itself a difficult or dangerous task. The hassle is the time involved in reconfiguring the newly flashed device. Restoring files and settings from a memory card backup is rapid enough, but restoring third-party applications takes a considerable amount of time. My own upgrade to 4.1 on an N800 tablet took less than five minutes for data and configuration, but more than 45 minutes to fetch, install, and configure 31 additional applications from different repositories.

In addition to the convenience factor, per-package updates will allow Nokia to roll out new apps and services individually, rather than rolling an entire new release once every 12 months. That is undoubtedly better for the company, and ultimately better for users as well.

Email for the masses

The other major improvement in Maemo 4.1 is the new email client Modest, based on Philip van Hoof's Tinymail framework, designed for embedded and low-resource devices. It supports SMTP, POP, and IMAP, all with encryption, as well as the push email technique known as IMAP-IDLE.

Modest has been available as a beta since December 2007, and is reputed to be much faster than the old email client it replaces, especially when it comes to IMAP performance. In my own tests, that reputation is well-deserved. I set up several IMAP accounts, and Modest fetched message headers and folder names nearly instantaneously, including messages on a catch-all Gmail account that receives hundreds of messages daily. Modest was even faster than the Gmail Web app itself.

Despite the name, Modest is full-featured, supporting multiple accounts, per-account signatures, and other niceties frequently absent from embedded device email apps. I also appreciate the ability to specify different SMTP servers based on differing active network connections -- your personal level of paranoia may lead you to choose different servers when on a secured or unsecured network, but corporate users with IT policies to consider are the real winners here.

Looking forward: the tablet is the desktop

There are small changes in Maemo 4.1 as well, including browser speed-ups and OpenSSL fixes, but the greatly improved email client and adoption of a per-package system updating framework outshine the incidental bug fixes and version bumps.

The 4.1 update may not pack as many new features as 4.0 or 3.0, but it is important to consider it in another light: as part of the platform's progression from a closed, consumer-electronics-like device to a system more closely resembling any other Linux distribution.

Since Maemo's inception, the team at Nokia has slowly replaced closed components with free software alternatives, has made it easier for users to install "unapproved" applications, has opened up shell and root access, and now is making the system upgrade process function like a traditional desktop distro, not a cell phone. With all of the recent acquisitions Nokia has made in both the open source and handheld device realm, it will be interesting to see where it takes Maemo from here.

Sunday, July 13, 2008

A case for text-based DVD rippers

At a time when graphical DVD rippers and encoders propose to make the backing up of your movies just a click away, a text-based application may actually be the best tool for the job.

I've tried graphical rippers such as AcidRip, dvd::rip, thoggen, and RippedWire, with varying degrees of success. However, I've also had my share of headaches. Most times, any crashes or problems I experienced were related to the graphical components of the application or the desktop. It's not pleasant (to say the least) to leave your computer eating electricity all night, only to find in the morning that the ripping and encoding of a DVD failed because of an error purely related to GTK+ or Qt. It's even more frustrating when you realize that most of these applications are front ends to command-line programs. For instance, AcidRip is a wrapper for MEncoder (not that MEncoder doesn't need a front end), and RippedWire sits on top of HandBrakeCLI. Once you click the Go button, the application basically becomes a giant progress bar, hogging your desktop and system resources.

undvd

After having trouble running a GUI-based ripper/encoder on my fresh install of Arch Linux, I stumbled upon undvd. Its only core dependencies are lsdvd and MEncoder, so I decided to give version 0.3.1 a try.

Being a command-line application, undvd installed in the blink of an eye. Running scandvd.shscandvd.sh will exit. After deciding upon the title to rip, run undvd.sh, specifying a few, simple parameters. For instance, to rip and encode the first title of a DVD, together with an English audio and subtitle track, you can run undvd.sh -t 01 -a eng -s eng. with a DVD loaded in the drive provides you with a simple screen that shows you the titles available on the disc, and basic instructions on how to watch them using MPlayer, or rip them. After that,

A more complex example rips the second track of a DVD (with a French audio track, without subtitles), forcing one-pass encoding. It assumes the DVD is encrypted (and requires libdvdcss to read) and rips straight from the optical disc, using a picture-smoothing filter and Xvid compression:

undvd.sh -t 02 -a fr -s off -1 -u -n -f -x

The result (in both cases) is an AVI file of surprisingly good quality. Other options include forcing two-pass encoding, selecting a target size for the AVI file, and video scaling.

undvd rips and encodes the titles to the folder from where you called the application, so beware of disk space issues. The default is for undvd to dump the entire DVD to disk, after which you can remove it from the drive. undvd then rips and encodes from the ISO image on disk. This protects the DVD from overuse and eliminates failed operations due to read errors. However, you can also rip directly from the DVD or from a folder.

I'm usually a nitpicker when it comes to lack of options, but my first encounter with undvd managed to make me a believer. The interface is simple but effective, and pressing the Enter key a couple of times -- or writing a short string of arguments -- is more practical in my book than navigating through tabs and checkboxes.

h264enc and xvidenc

Shortly after discovering undvd, I came upon h264enc and its siblings, xvidenc and divxenc. The author describes h264enc as an interactive script and defends the advantages of a bash script over a GUI application in his informative FAQ. h264enc does basically the same job as undvd (it also uses MEncoder), but it allows for more fine-tuning of the encoding options. The beauty of h264enc is that you can make the ripping/encoding process as simple or as complicated as you want. You can pass through as few menus as possible, or you can take your time tweaking the options. Forty-one quality presets, including presets for portable devices like Apple's iPod, make your life easier.

The man page shows you everything you need to get started. Running h264enc -scan scans the DVD for information on chapters, audio, and more, and presents it to you. After that, you can run h264enc with the necessary parameters to your liking. For instance, to rip the second track of your DVD again, type h264enc -2p -p hq. This makes a two-pass encoding with the High Quality preset. h264enc then shows a series of interactive menus where you can choose your DVD drive, the video track to rip, the audio track, chapters, angles, and so on. You can also choose postprocessing filters (such as deinterlacing, noise removal, and image sharpening) and define the video bitrate, target size, audio codec, and more. If you're in a hurry or confused, simply choose the defaults. h264enc encodes the files to the H.264/MPEG-4 Part 10 standard, using the AVI container by default. You can choose other containers, such as Matroska Multimedia Container (MKV), Ogg Media (OGM), and MPEG-4 Part 14 (MP4). You can also store your settings for a particular job in a file, thus creating your own presets. Storing different settings for different jobs allows you to create batch jobs, which is a great feature to have at hand.

The quality of the final product varies according to the quality of the original video and the settings you choose. After some experimentation and following the advice of the FAQ, I achieved excellent results. Using three-pass encoding with a Very High Quality preset and a target size of 1400MB, for example, gave me a video file practically indistinguishable from the original DVD in terms of picture quality.

Conclusion

I use undvd for most tasks, and h264enc when I need more control over the output (for extreme high-quality rips, or movies with low image quality). Still in the realm of text-based applications, you also might want to consider RipDVD and HandBrakeCLI as sound alternatives. HandBrakeCLI in particular supports multiple CPU cores -- something most other rippers and encoders don't do. Although HandBrake isn't as easy to use as h264enc or undvd, a recent article may help with that. dvd::rip also supports multiple CPU cores, as well as the ability to set up a cluster to increase processing power.

These applications show that a command-line based workflow, in the context of common desktop tasks, still has its place, especially when you want power and simplicity.

Saturday, July 12, 2008

Protecting against evil code fragments with HTML Purifier

HTML Purifier is a project that helps you ensure that HTML is valid and does not contain cross-site scripting attempts or other nasty attacks. With HTML Purifier you can allow users to post HTML content without letting them insert nasty code that will run in the browser of anyone viewing that HTML. An assortment of plugins let you use HTML Purifier with CodeIgniter, Drupal, MODx, Phorum, Joomla!, and WordPress. To get an idea of the cleanups that HTML Purifier can perform, head over to the demo page.

HTML Purifier uses a whitelist approach to security, where all parts of a valid HTML document must be explicitly permitted, rather than a blacklist that looks for known nasty HTML code. The smoke test page explicitly lists which things are permitted and in what context. One aim of HTML Purifier is that it should fully understand what valid HTML is, which elements can be nested in others, and what is valid content for the HTML attribute attached to a particular element. HTML Purifier also includes support for CSS and can do things like translating text prefaced with http:// into proper HTML href elements automatically. If you are already using an HTML validation tool, you might like to take a look at the project's comparison page to see if you might like HTML Purifier as a replacement.

There are no packages of HTML Purifier for Ubuntu, Fedora, or openSUSE. HTML Purifier can be installed using PEAR, which not only gets it installed quickly but also allows you to easily move to the latest version using pear upgrade. PEAR makes including HTML Purifier in your scripts simpler because you do not need to specify any path in your script. There are also three different tarballs offered for those who want to build HTML Purifier manually from sources. The different versions include the code offered with and without documentation, and a third tarball that includes all the dependencies you need.

To install HTML Purifier through PEAR you must first install the php-pear package, then use the pear command to install HTML Purifier. The commands below will install HTML Purifier at /usr/share/pear/HTMLPurifier.


pear channel-discover htmlpurifier.org
pear install hp/HTMLPurifier

For me, trying to use HTML Purifier at this stage failed with an error in the Apache log files about the Cache.SerializerPath path not existing. HTML Purifier tried to use /usr/share/pear/HTMLPurifier/DefinitionCache/Serializer as a writable path for caching content. The cache can be turned off as detailed in the INSTALL file, or you can create the directory in /usr that HTML Purifier wants to use as a volatile cache, or create a new directory in /var to handle the cached data. The third option is shown below:


# mkdir -p /var/cache/HTMLPurifier
# chown apache /var/cache/HTMLPurifier
# chmod o-rwx /var/cache/HTMLPurifier
# ls -ld /var/cache/HTMLPurifier
drwxr-x--- 2 apache root 4096 2008-06-25 14:25 /var/cache/HTMLPurifier

Unfortunately the default path for the SerializerPath is encoded in HTMLPurifier/ConfigSchema/schema.ser, which is a length-delimited file that is not very human-edit-friendly. The best solution is to use a configuration object in your PHP code to change the path, or better yet, your own PHP function that sets up the configuration object for your Web site.

Below is a simple index.php file that uses HTML Purifier to clean up HTML content that is submitted via a form supplied on the same HTML page. Note that the call to htmlspecialcharspre element. is not used for security, but simply to enable the HTML text entered by the user to be fully seen within the


# cd /var/www/html
# mkdir HTMLPurifierTest
# chown ben.apache HTMLPurifierTest
# chmod +s HTMLPurifierTest
# su -l ben
$ cd /var/www/html
$ vi index.php

require_once 'HTMLPurifier.auto.php';

$config = HTMLPurifier_Config::createDefault();
$config->set('Core', 'Encoding', 'ISO-8859-1');
$config->set('HTML', 'TidyLevel', 'heavy' );
$config->set('Cache', 'SerializerPath', '/var/cache/HTMLPurifier' );
$purifier = new HTMLPurifier($config);

?>


Enter your nastiest HTML below!


This is the clean part of what you said...


$clean_html = $purifier->purify($query);
print htmlspecialchars($clean_html);
?>


If you wish to explicitly limit the HTML elements that a user can enter, use the ForbiddenElements configuration directive as shown below. This example will strip out any bold, italic, or preformatted tags from the HTML entered. You can also go the other way and explicitly whitelist which elements are valid using AllowedElements.


$config->set('HTML', 'ForbiddenElements', 'b,i,pre');

HTML Purifier includes support for filtering and mangling URIs both before and after the main validation. Being able to filter before you validate the HTML input allows you to change URIs that are not valid into something that is so that HTML Purifier does not reject the URI. For example, if you are allowing the user to link to images or other media files, then you might just pass in the unique identifier of the image and have a custom URI mangler substitute these custom URIs with real absolute HTTP URLs.

One URI filter is the host blacklist, which lets you block given host names. Be careful using the host blacklist, because if anything you blacklist appears anywhere in the URL it will be rejected. Luckily the code for the host blacklist class is short, so you could easily define a class that tested for only URLs ending with a given postfix. There are more such URI filters listed as possibly coming soon.

Wrap up

Presumably the installation issues with the cache directory are a limitation of PEAR. At least having HTML Purifier fail to work while producing a nice verbose error message forces the issue of where to store volatile cache documents rather than just silently using a path under /usr.

HTML Purifier offers protection against people entering nasty HTML code instead of well-formed HTML fragments in your Web forms. The ability to enter whitelists for things like which HTML elements can be used along with URI filtering should also take the fun out of users trying to explicitly enter invalid data into your forms. URI filtering is a great option for helping with forum spam if you are allowing anonymous forum posts. For example, you could enforce a policy that allows people to post only links to your own site when they post anonymously, and if they want to link to another site then they have to register first.

Friday, July 11, 2008

Looming IT talent shortage sidesteps FOSS folks

A Gartner study from earlier this year suggests that a skills shortage will leave companies scrambling in vain to find qualified help. However, open source developers say there's an adequate supply of potential employees with the skills they have.

"The difficulty is not so much if they exist. It's finding the right people," says Jon Masters, a Red Hat Linux kernel engineer who also works on the real-time kernel team and helps support third-party drivers on Enterprise Linux distributions. He says that the supply of competent Linux and open source software types will be enough to meet the demand.

In the study, researchers at Gartner, a Stamford, Conn.-based research and advisory company, say that a coming skills and talent shortage in IT and business is threatening business growth. Meeting the demands created by the integration of IT and business models, they say, will require companies to find hybrid professionals -- workers with both technology and business skills. But the problem, according to researchers, is that such workers are scarce.

Masters says this is not the case among the Linux and open source software developer crowd. "We do have a lot of these hybrid professionals." He says such professionals are a resourceful bunch with a wide range of skills that will enable them to readily adapt to changing realities as IT and business coalesce.

Masters says the industry's emphasis on self-directed learning helps developer types think outside of the proverbial box in a way that might be foreign to their counterparts in the proprietary software space. "You don't have to be a computer scientist to get involved in Linux. But you do need to be able to problem-solve, work well with other people, and work on different things at the same time."

In Morrisville, NC, Open Technology Group has for over 10 years developed, deployed, and trained others to use IT solutions that promote openness and interoperability. Chander Ganesan, the company's president, says that -- based on the types of people who retain OTG's services in areas such as PostgreSQL, MySQL, PHP, Python, and shell programming -- the industry has its fair share of people with work-related experiences that epitomize what hybrid professionals are all about.

"A great many of [our clients] may already have a single area of knowledge and wish to broaden their skill set to become more versatile in their jobs," Ganesan says. "Additionally, we see that often the employees -- as opposed to a manager or traditional decision-maker -- are approaching us about training, and then selling their needs up the chain to management. This is fundamentally different, from my perspective, since it leans toward employees themselves being driven toward being hybrid professionals as opposed to upper layers of management."

According to DeLisa Alexander, senior vice president of human capital for Red Hat, her company's certification programs contribute towards producing hybrid professionals. "We're contributing toward training people who businesses need. We are looking for those hybrid professionals."

Thursday, July 10, 2008

OpenOffice.org extension will add PDF editing

Easy PDF editing is coming to OpenOffice.org, but you'll have to be patient for a few months. Recently posted to the OpenOffice.org Extensions site, the Sun PDF Import extension (SPI) is only in beta, and only works with recent developer builds of OpenOffice.org 3.0, which is scheduled for September release. Right now, the quality of the final release is anybody's guess, but the beta's capabilities fall squarely in the middle of the available PDF import tools.

To investigate SPI, you need to download and install a snapshot build of OpenOffice.org 3.0. Then, from within the build, you can install SPI from Tools -> Extension Manager. The next time you start OpenOffice.org 3.0, you'll be able to open PDF files from any of the options for opening an existing document in the File menu.

By default, SPI opens PDF files in the Draw application, although you could also use Impress, which shares much of the same code. This default might seem strange at first, especially if your PDF file is text. Actually, though, using Draw is logical, given the limitations of the PDF format. No application -- not even Acrobat, the proprietary PDF editor made by Adobe, the company that wrote the PDF specifications -- is able to edit more than a single line while preserving format. Given this limitation, importing to Draw makes sense, because it can treat each line as a separate text object for editing. Although rearrangement of a paragraph requires line by line editing with SPI, and can be tricky if you need to add an extra line, the extension leaves you no worse off than any other PDF editor.

But at least you are in a relatively friendly user interface. Aside from the limitation of editing one line at a time, the worst problem you are likely to have is the automatic capitalization of the first character of each line if you have Autocorrect turned on while you edit.

In testing, SPI's success at importing text depended largely on the fonts being used in the document. For best results, you need to have the fonts in the imported PDF file installed on your system; otherwise, SPI will use a substitute font that may not correspond to the letter spacing of the original. Also, while common fonts such as Helvetica or Times Roman create few problems, SPI seems to have trouble reading the metrics of some PostScript fonts and displaying them correctly. Usually, the display problem takes the form of a line of text that, converted to a text object, extends far beyond the page margins, and makes reformatting tedious if not impossible. At times, too, the problem leaves random spaces scattered throughout all the lines.

Graphics in imported PDF files had similar mixed success during testing. Many import into Draw without any trouble, with text wrapping around them in the same style as the original document. However, some PNG images -- but not all -- were imported vertically inverted, and, in another case, a graphic became an uneditable object. And, in some complex layouts, the positioning of some graphics was off by perhaps a dozen pixels.

In the beta, SPI cannot handle PDF forms, and text alignment is not always preserved, with fully justified text showing a strong tendency to import as left-aligned. Nor are hyperlinks supported, although they are a basic necessity for many online documents.

Otherwise, the list of what SPI can handle is much larger than the list of problems: Text frames, sections, multilevel lists, and table formatting including border and background color, are all imported without any problems, all of which makes for a promising start for the extension.

For now, though, the problems with rendering fonts and graphics mean that SPI, like OpenOffice.org 3.0, is not ready for production use.

Still, in its current state, SPI is ahead of Abiword, which simply extracts the text from a PDF file and not the graphics, and KWord, which preserves line division but not most other text formatting.

But SPI's current state is behind that of Inkscape, whose main limitations are a restriction to single-page imports and the failure to preserve hyperlinks. Nor is SPI as reliable as PDFedit, which, despite being aimed at advanced users, remains the most reliable PDF editor for the GNU/Linux desktop. Still, a lot of development can happen in the next few months, and if SPI continues as it has started, its final release just might become an essential OpenOffice.org extension.

Wednesday, July 9, 2008

An introduction to the Kismet packet sniffer

Kismet is a wireless "detector, sniffer, and intrusion detection system," and one of the growing list of essential open source tools for computer network security professionals. Kismet runs on any POSIX-compliant platform, including Windows, Mac OS X, and BSD, but Linux is the preferred platform because it has more unencumbered RFMON-capable drivers than any of the others.

Monitor mode ability is critical to fully utilizing Kismet, because it allows Kismet to examine all the packets it can hear, not just those of whatever access point (AP) -- if any -- you are currently associated with. Almost as important to police, intelligence agencies, and black hat hackers is the fact that it allows Kismet to work passively, intercepting and collecting packets without leaving any fingerprints of its own behind.

The point is that if you want to investigate Kismet fully, the first step is to ensure that you have a driver taht supports RFMON -- monitor mode -- for your wireless network interface card (NIC). Check the Kismet links page for information on the drivers available for your brand and model NIC.

Configuration models

Kismet is designed as a client-server application, but it can be run as a standalone application, as a server supporting a number of clients, and even as a server with "drone" Kismet installations across a network, each monitoring its own wireless hardware, and all forwarding captured packets to a server. Run standalone, you simply use the built-in client. But there are also a number of third-party clients available for Kismet; if you would like to try one, visit the same page of links noted above.

Kismet drones are minimalistic, often headless, Kismet listening posts across a network. Each uses its own individual configuration file, defining its own sources -- wireless cards -- to listen to, and containing the address of the Kismet server to which it will forward captured packets. The server logs the data from all attached drones to a single file, and can also provide a single source of wireless intrusion alerts for the network. This configuration is ideal for utilizing Kismet as a wireless intrusion detection system (IDS) across a LAN with more than one or two APs.

Each of these components requires its own configuration file, and those files do much of the work required to get Kismet performing as you wish. They are the kismet.conf, kismet_ui.conf, and kismet_drone.conf files. The Kismet Web site contains extensive documentation on the configuration files and other things you may need to tweak.

I tried Kismet in a standalone configuration, running from the BackTrackNETGEAR RangeMax wireless PC card. Even in such a simple implementation, the configuration details can bite you. Among other things, pay careful attention to the section in the online documentation about defining your wireless cards, which Kismet documentation refers to as capture sources. The definition has to be correct or Kismet will not work at all or not work correctly. 3 distro beta, and using a single RFMON-capable NIC, a

As noted in my Backtrack 3 review, I also had to use ifconfig to disable my laptop's built-in wireless card, which like the NETGEAR RangeMax is based on the Atheros chipset, then use wlanconfig to put the NETGEAR card into monitor mode prior to starting Kismet.

Top-down UI

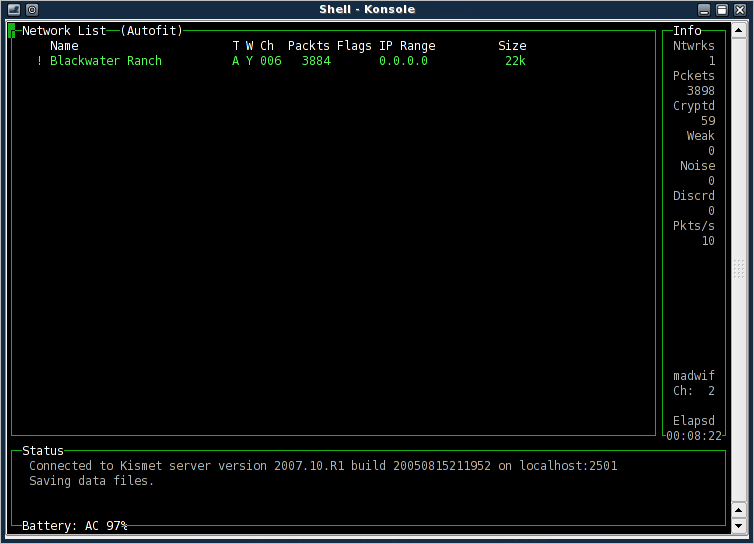
The Kismet user interface is not intuitive, but it is fast and powerful, and easy to use once you get used to it. By default, the UI opens with Autofit, a top-level list of all the networks it can see (Figure 1). From this viewpoint, you can learn basic information about the networks detected, but -- unlike other network list modes -- you can't drill-down for more detailed information.

The Autofit Network listing shows a decay indicator, network name, network type, WEP status, channel used, packets seen, flags, IP range, and the size of the capture file. The decay indicator may be an exclamation mark (!), a period (.), or a blank. An exclamation mark indicates recent activity, the period less recent activity, and blank means no recent activity. The definition of recent is based on the decay variable in kismet_ui.conf. The default decay value is three seconds.

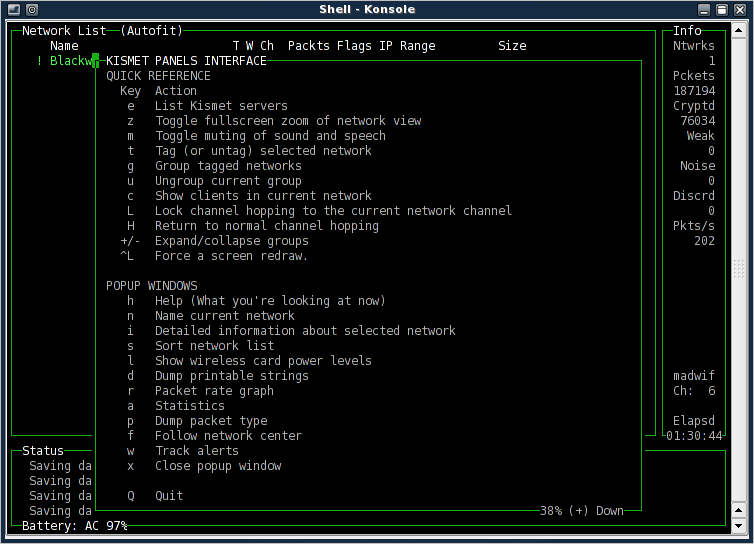
To drill down and gain more specifics, you first have to change to a different view. The Kismet interface provides a help function that explains in detail how to do this. Press h to get the help pop-up window (Figure 2). You can press x to close it or any other pop-up you may be viewing, and you can scroll through the help screens using the Page Up and Page Down keys.

If you scroll to the last screen in the help pop-up, you'll see the following in capital letters: ALL NETWORK SELECTION, TAGGING, GROUPING, SCROLLING, AND SO ON IS DISABLED IN AUTOFIT MODE. So let's change modes and see what else Kismet can tell us about the network.

After closing the help pop-up, press s to select a different sort order for the network list, then press b or B to order the list by BSSID, which is the MAC address of the network's AP. The title of the Network List panel will now read Network List (BSSID), and you can use the up or down arrow keys to scroll up and down the list to the device you're interested in learning more about.

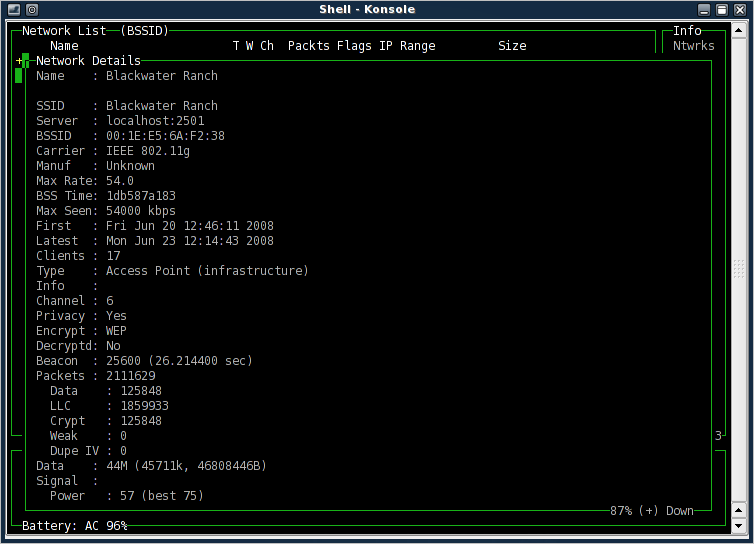
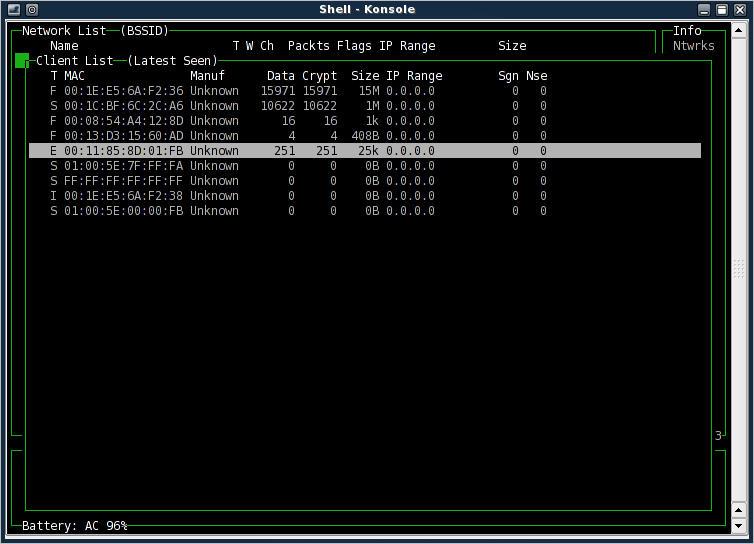
With the network of interest highlighted, press i to get complete, detailed information about that AP (Figure 3). Press a to see statistics about its traffic by channel, or press c to view the MAC addresses of all clients Kismet has detecting talking to the AP (Figure 4). If you're using Kismet to protect your own AP, that last choice will be especially interesting to you.

Note that when the client list appears after you press c, the panel window shows Client List (Autofit). It works just like the Network List, meaning that in order to drill deeper, you'll need to change the view in the same way you did before. I chose l to list the clients in latest seen order (Figure 5). A capital L would reverse that list, so that the most recently seen clients would appear at the bottom.

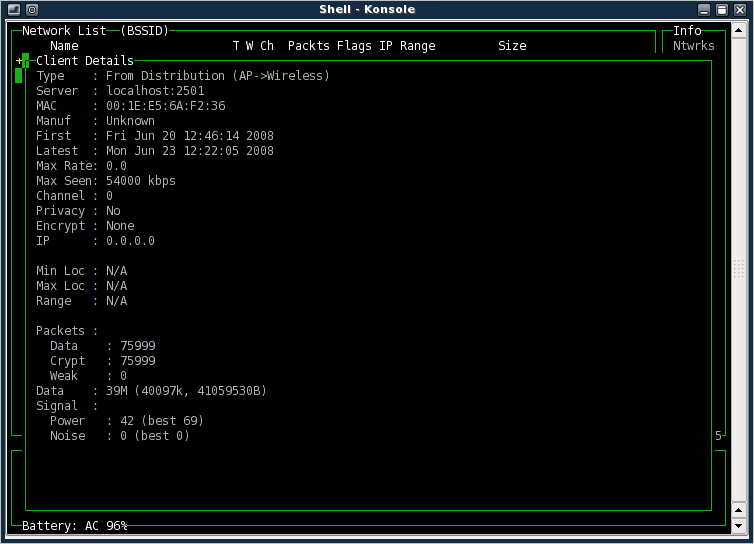
Highlight a particular client, just as you did a network, then press i to see what information about the client is available. Kismet will show you the data in Figure 6, which includes the type of connection, MAC address, and much more.

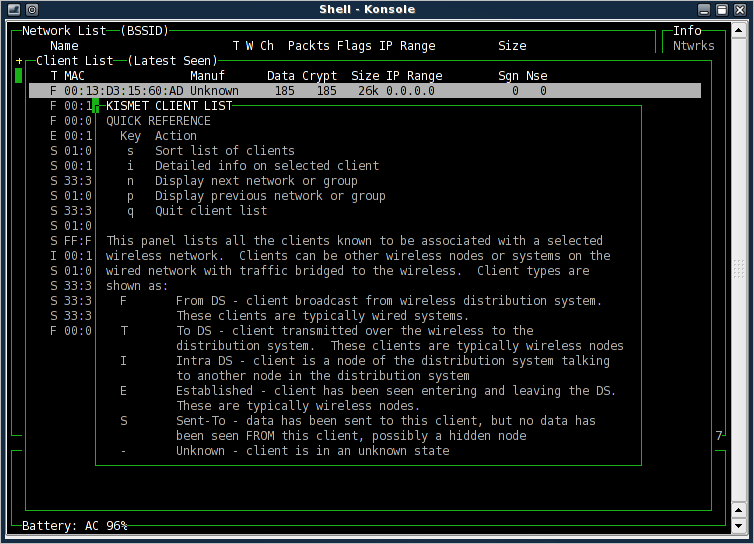
Also note that the h function now shows context-specific help, not the same help information you saw when pressing h with the default Network List displayed. In this case, most of the screen is dedicated to explaining the various connection types: From DS, To DS, Intra DS, Established, Sent To, and Unknown (Figure 7).

Basic configuration tweaking

You'll want to change your kismet.conf options depending on how you are using Kismet. If you are searching for APs, for example, you'll have channelhop = true set, at a minimum, and perhaps some finer-grained tweaks as well. If you are focusing exclusively on a single AP and want all the traffic you can get from it, you'll turn channel hopping off so as not to miss packets while scanning other channels. This can be useful for intrusion detection, since you'll want to track all clients attempting to or actually associating with the AP.

By default, Kismet writes its logs the to the directory it is started in. You can change this behavior with the logtemplate directive in kismet.conf. Unless you modify the logtypes directive in kismet.conf, Kismet will create dump, network, csv, xml, weak, cisco, and gps logs. The dump log contains raw packets and is suitable as input to other packet analyser programs, such as Aircrack-ng or Wireshark, the network protocol analyzer once known as Ethereal.

Conclusion

Kismet is a difficult to use for a noobie. You can't just install it and go and get any sort of meaningful results. It has to be properly configured, and properly configuring it may require that you learn more about wireless networking, hardware, and wireless security than you already knew. But the good news is that if you suffer through that pain, and learn more about those things, you'll find it worthwhile, because the more you know, they more it can do for you.

Kismet is capable of a lot more than I've covered here. The more you know about wireless and wireless security, the more of Kismet's feature list you can use, including things like decloaking hidden SSID networks and creating graphical representations of wireless networks.

But even at my relatively low level of wireless security knowledge, Kismet provides me with an important safeguard for wireless access to my home office LAN. I've already learned a lot more about wireless insecurity than I knew when I started. In particular, I've learned why not to rely on WEP to protect confidential data or communications, and how to detect unauthorized wireless access on my APs. All of which points to an additional important feature not noted in the documetation: Kismet is a great learning tool.

Tuesday, July 8, 2008

IOzone for filesystem performance benchmarking

IOzone lets you benchmark your filesystem performance, seeing how well record IO occurs for files of various sizes. With IOzone you can see more detailed information than the read, write, and rewrite figures that Bonnie++ reports. IOzone is great at detecting areas where file IO might not be performing as well as expected.

IOzone is available for openSUSE 10.3 as a 1-Click install, in multiverse for Ubuntu Hardy, and is in the standard Fedora 9 repositories.

The simplest way to invoke IOzone is using the -a option to select full automatic mode, with the -g option to extend the maximum file size to be twice your system's main memory size:


$ time iozone -a -g 4G >|/tmp/iozone-stdout.txt


The size specified with any option can have the m or g (not case-sensitive) postfix to specify units of megabytes or gigabytes. Redirecting the standard output to a file allows you to generate graphs from the output without having to copy data from the terminal. Wrapping the invocation with the time command lets you know how long a full invocation took, so you are aware of how long IOzone took to execute and possibly tailor future invocations to specific areas of interest to avoid waiting for all the tests to be performed. The above command took a few hours to complete on a hardware parity RAID over six 750GB drives.

You can use the -n option to specify the minimum file size that the automatic mode will use during testing. Normally testing will start with 64KB files and increase the size by doubling it each iteration. Using -n can save some time and generate more targeted benchmarks if you are interested in only larger files that cannot possibly fit into the system buffer caches. You can use the -s option instead of -g to only test files of a specific nominated size. The below command will test only using files of 4GB in size and records from 4KB to 256KB in size.


$ time iozone -a -s 4G -q 4 -y 256 >|/tmp/iozone-stdout.txt


The tests performed by IOzone measure many things, starting with the simpler metrics such as read, write, reread, and rewrite performance. Read and write are obvious. Reread is measures how well a system caches a file that was recently read. There are two rewrite tests; the one reported as simply rewrite overwrites an existing file. The record rewrite writes to a specific location in a file over and over again.

Figure 1 -Click to enlarge The normal read and write tests are performed by sequentially getting and putting data to a temporary file. There are also random read and write tests, which obtain or write to little pieces of the temporary file instead of reading or writing it sequentially. If you are running IOzone on a filesystem created on a RAID, then the stride read test (see -j) might be interesting. The stride read test can show you if there is a performance penalty for reading records which are not aligned to your RAID stripe boundary. For example, in a four-disk RAID-5, data is split into chunks (perhaps of 64KB in size) and written over three disks with parity written on the fourth. So at the start of the disk 1 you have chunk 1, disk 2 starts with chunk 2, disk 3 with chunk 3, and finally disk 4 contains the parity of chunks 1-3. Chunks 1-3 are called a RAID stripe. Sometimes the parity chunk is included in the stripe too. The order of chunks and parity is changed in each stripe, maybe for the second stripe putting the parity on disk 1 and the chunks 4-6 on disks 2-4. Because the parity has to be updated when any chunk in a stripe is changed, varying where the parity is stored helps even out the IO across all of the disks in the RAID. Typically, applications try to access records at chunk or stripe boundaries. IOzone's stride parameter can be used to test performance of read requests which are and are not aligned to a RAID stripe. The strided read test reads records at a given stride offset (number of bytes apart), so you might like to set the stride to some whole multiple of your RAID chunk size. There are also versions of read, write, rewrite, and reread that are performed using the buffered fread() and fwrite() calls. These tests might show if your C library is causing some performance bottlenecks.

IOzone provides many options to control how data is read and written during the benchmark, so you can produces IO requests in a manner close to that of the application you intend to run on the machine. The options are described in alphabetic order in the IOzone documentation, but I have grouped them by their semantics in the following paragraphs.

Figure 2 - Click to enlarge This first grouping of options relates to which API IOzone uses to perform the benchmarking. Memory-mapped files can be convenient to use because they do not require programs to explicitly execute read() functions to get file data; instead, data is loaded automatically when memory locations are accessed. However, programmers using memory-mapped files need to understand that there are potentially large seek delays when accessing large memory-mapped files with random IO patterns. There is no cut-and-dried rule as to when memory-mapped files should be used by applications, and the API does not change the performance limitations of the filesystem backing the IO.

The -B option causes files to be accessed through the memory-mapped APIs. You can use -D to specify that data should be transferred by the operating system asynchronously for these memory-mapped files. The -G option expressly specifies synchronous memory-mapped files be used. Applications that perform memory-mapped IO can tell the kernel of their access patterns using the madvise system call. This allows the operating system kernel to tailor caching to match how the application has specified its access patterns to be. You can use the special -+A option to tell IOzone how it should madvise the kernel during tests performed using memory-mapped IO. The -H and -k options use POSIX async IO calls during the benchmark, and -H will also perform a copy from the memory buffer that was used by the operating system to perform the async IO request. Both -H and -k accept the number of async operations that should be attempted at any time as their argument. The -E option will use the pread API during benchmarks, the pread() call operates on file descriptors like the read() API but includes the offset in the file that data is to be read from.

Another collection of options deal with how benchmarks are measured. The -c option includes the close() call in the time taken for the benchmark. If you are running on a filesystem that might delay committing changes to disk until a close() call, such as NFSv3, using the -c option should give you a fairer impression of filesystem performance. The -e includes a flush call in the benchmark. The exact call made to flush data to disk is dependent on which IO subsystem you are using; for example, when benchmarking with file descriptors the fsync call will be used. Flushing is important in benchmarking because many database systems perform flushes to ensure that writes are on disk. The -o option opens file with the O_SYNC synchronous mode set, causing all writes to be flushed to disk immediately.

IOzone by default uses the current directory as the target filesystem for benchmarking. You can specify another location using the -f or -F options. -F works like -f but allows you to specify multiple locations for when you are testing multiprocess or multithreaded filesystem performance. The -U option specifies the mountpoint that the filesystem you are testing is located on. Specifying -U makes IOzone unmount and remount a specified filesystem between each test to flush any filesystem buffers.

The -j option sets the stride of file reads used for the stride read test. Each record read by IOzone in the stride read test will be separated by stride bytes. The -q and -y options specify the minimum and maximum record size used in automatic testing mode. You can use the -r option to specify a single record size that should be tested instead of the range from -q to -y. The parameter you pass to -j is multiplied by the record size, so if you pass in your RAID stripe size and use a range of record sizes using the above options you will be able to test aligned and unaligned performance and see both results on a single graph.

You can cherry-pick which tests are performed during benchmarking using a sequence of -i options. Unfortunately the -i option accepts numeric input values rather than allowing more human-readable options to be passed in directly. Most of the tests you can select rely on the write (-i 0) tests having been performed so that files have been created and initialized by IOzone. For example, to perform only read (1) and write (0) tests, use the -i 0 -i 1 options. The numbers for each test are shown in the output of IOZone --help.

You can run benchmarks with multiple processes by specifying the -t throughput mode and specifying the number of threads or processes to create. The -T option causes POSIX pthreads to be used to create the multiple threads for throughput testing. Being able to nominate the use of pthreads instead of processes allows you to benchmark IO with IOzone using the multithreading/multiprocessing model that the application you are planning to execute uses. You can specify the minimum number of processes with the -l option and the maximum with the -u option.

There are also options such as -d and -Jb for inserting delays at various stages during the benchmark.

Interpreting the results

IOzone reports results on stdout in a tabular format starting with the smallest files you have nominated to create (64KB by default for -a automatic mode) up to the largest files. For each file size, your nominated record size range is tested from smallest to largest record size.

The IOzone package comes with scripts to create nice graphs using gnuplot given the tabular output from IOzone. The gnuplot scripts are called Generate_Graphs and gengnuplot.sh. Generate_Graphs calls gengnuplot.sh multiple times to generate a graph for each test that IOzone performs in its benchmark and then runs gnuplot to show each of these graphs and generate PostScript output at the same time. Generate_Graphs uses the gnu3d.dem file to drive the gnuplot operations. You can easily customize this file to generate PNG bitmap images of each graph and not display the graphs interactively. The changes to gnu3d.dem to non-interactively generate PNG files are shown below:


set zlabel "Kbytes/sec"

set data style lines

set dgrid3d 80,80,3

#splot 'write/iozone_gen_out.gnuplot' title "Write performance"

set terminal png

set output "write/write.png"


splot 'write/iozone_gen_out.gnuplot' title "Write performance"

#pause -1 "Hit return to continue"


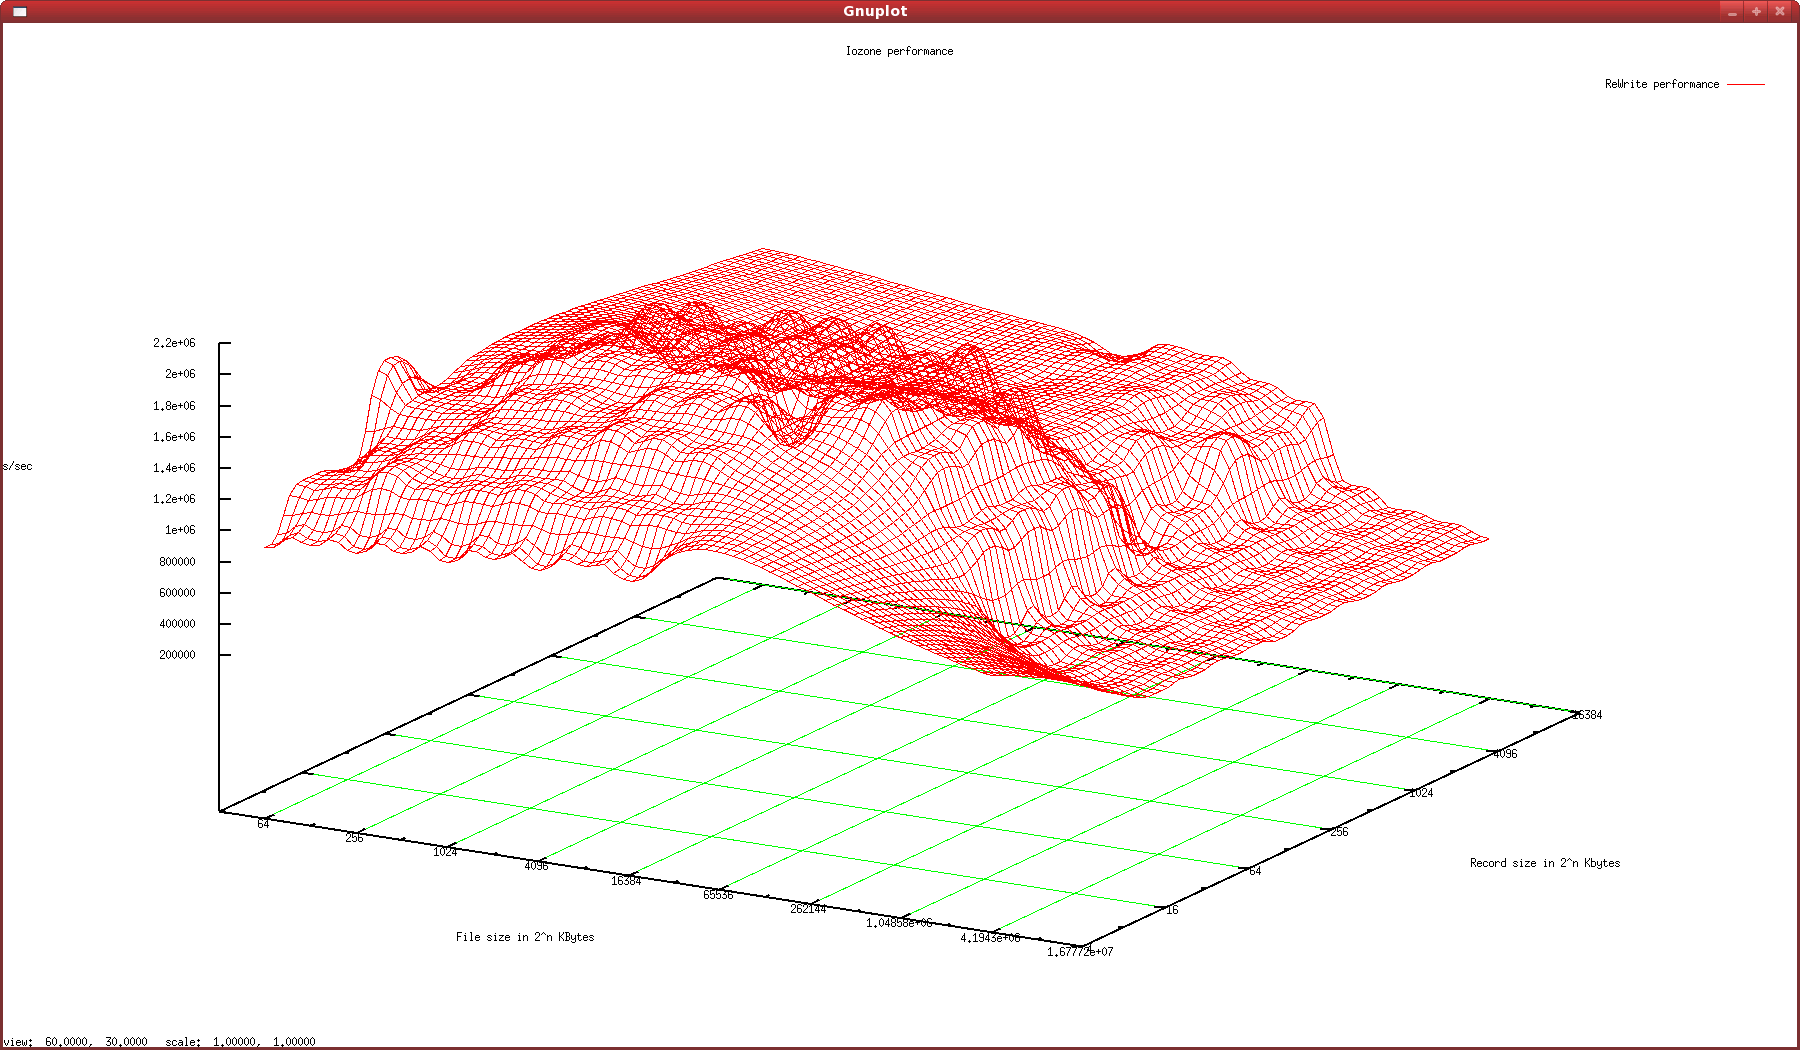
Shown in the screenshot in Figure 1 is the rewrite performance of a hardware parity RAID using a 256KB chunk size across six 750GB disks on a range of file sizes from 64KB to 4GB performed on a machine with 2GB of main memory. The benchmark was performed using the first iozone command shown above. Notice how performance is better before the record size exceeds 256KB. This is most likely because the RAID could perform a read-modify-write cycle for changes that are smaller than the chunk size. The dip in the front of the graph is due to smaller record size tests not being performed for larger files by the -a option.

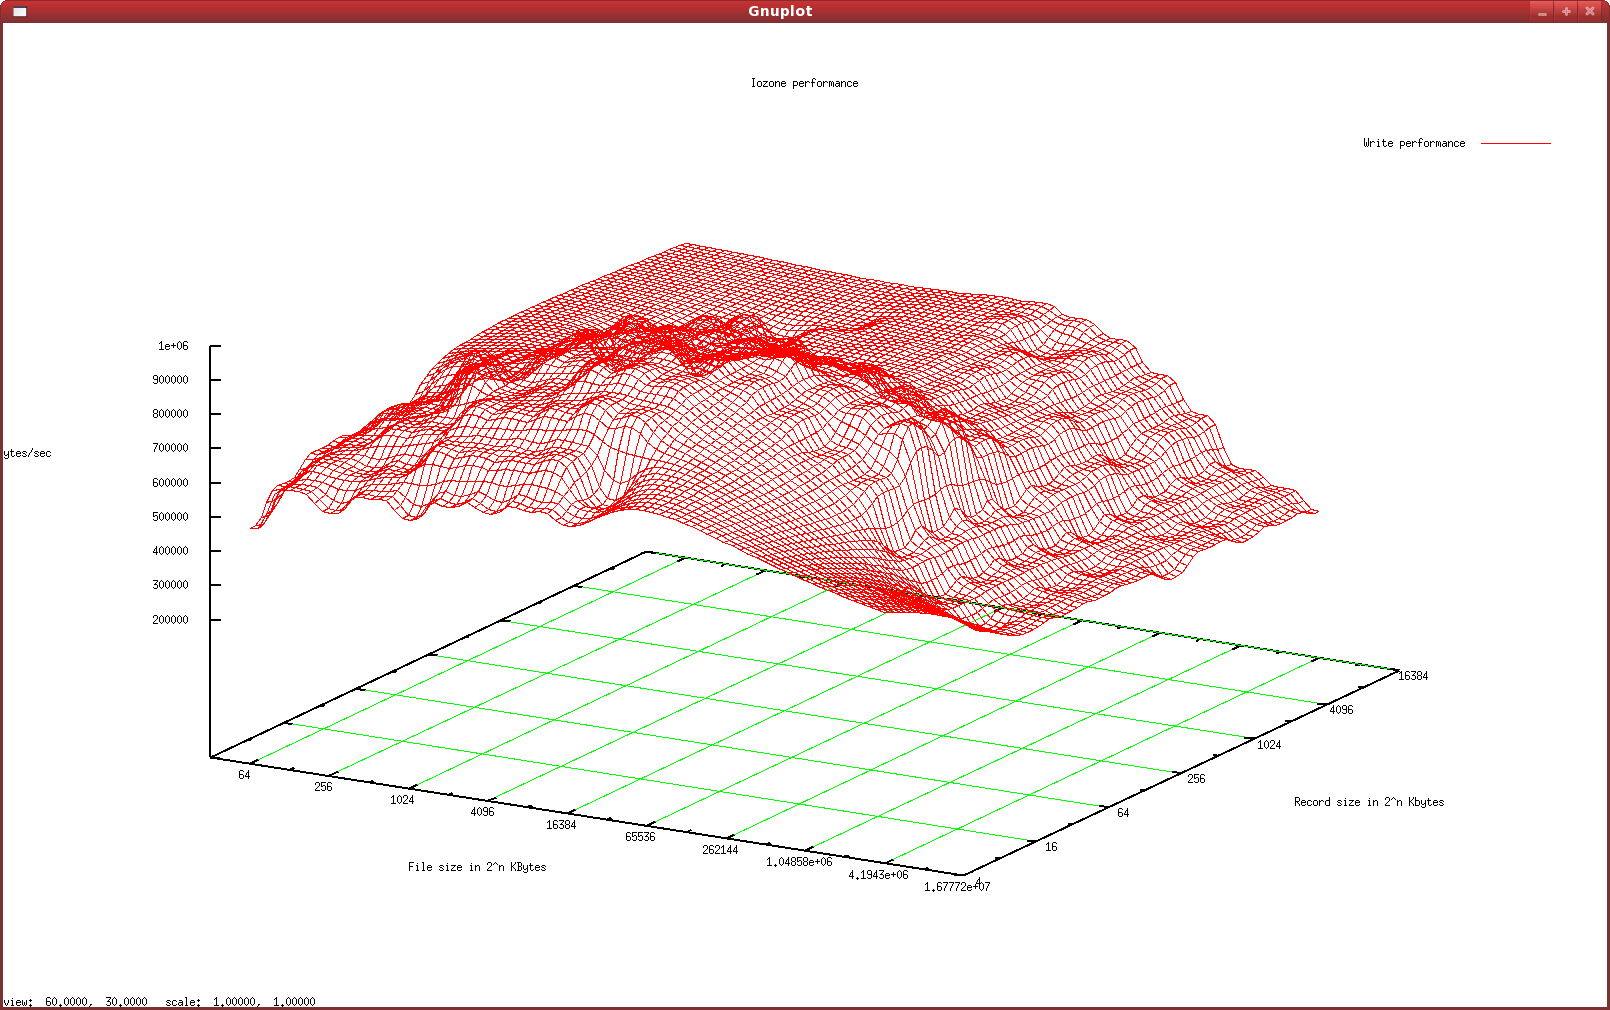
For the same hardware and filesystem setup the write performance is shown in Figure 2. One thing that sticks out in the benchmark is the little dip on the plane for the larger records. This happens for file sizes of about 16KB and records between 256KB and 4MB. This might have been an anomaly that occurred during data collection, or there might be a component in the system that does not perform as well for that file and record size. Notice that for larger files the smaller record size performs much better until the file size becomes too large for the system cache (around the label starting with 4.19 toward the right of the file size axis) and the performance of all record sizes becomes much closer.

Wrap up

IOzone allows you to specify a range of file sizes to operate on and a range of record sizes to use for testing in those files. Along with this you can choose which operating system API calls are used to perform the IO in the tests, letting you select the API that is closest to the application you wish to improve IO performance for. The ability to generate a 3-D graph of the read, write, rewrite, and other performance statistics lets you see if there are areas of IO that the system as a whole is not handling well. For example, some RAID controllers might handle record sizes below a certain cutoff better than other record sizes and with IOzone you will be able to see this drop in performance on the graph.

IOzone lets you dig into IO performance beyond the single read, write, and rewrite figures that Bonnie++ reports. It can help you see the trends in IO performance as you vary file size, record size, the API used to issue IO requests, and other parameters. Bonnie++ gives a good indication of performance in a fairly short test run; once you are happy with your Bonnie++ figures, you can execute IOzone, which may take perhaps two to four hours to expose finer details of your IO performance.

Monday, July 7, 2008

Barracuda launches reluctant legal offensive against Trend Micro

The already vicious lawsuit involving Barracuda Networks and Trend Micro that is currently in discovery in front of the American International Trade Commission (ITC) just turned nastier. Barracuda has filed its own patent infringement claim against Trend Micro, based upon three recently acquired patents. The suit is in response to Trend Micro's allegation that its patent is being infringed by Barracuda shipping Clam Antivirus (ClamAV), the popular free software application, and appears designed to pressure Trend Micro to reach a negotiated settlement.

"It's unfortunate that we have to spend time and energy and money doing this BS legal stuff when we could be spending that time and money and energy making the Internet a safer place," says Dean Drako, Barracuda's president and CEO. "It makes you sad."

Ask for a reply, Trend Micro representative Michael Sweeny responded, "We have not seen nor studied this most recent suit filed against us by Barracuda, and have no comment on it" and emphasized that the first action in the dispute was Barracuda's request for a declaratory judgment in March 2007.

The three patents involved in Barracuda's law suit are U.S. Patent 7093287, which involves creating firewall rules based on downloaded content; 7093294 , which concerns the detection of Trojans and backdoors; and 7103913, which covers virus scanning.

All of these patents are at least as broad as 5623600, the US patent on gateway virus-scanning that is at the heart of Trend Micro's case against Barracuda. The absurdity of replying to one overly broad claim with three others is not lost on Drako, who laughed and replied, "Really? I am all too familiar" when Linux.com pointed out the similarity.

"But we have no choice," he added, becoming instantly more serious.

Drako is reluctant to discuss details, but the patents were purchased from IBM some time in the last six months -- in other words, after Trend Micro filed against Barracuda. "I approached IBM asking for help in defense of the open source community, and they directed me to the individual who sells their patents," Drako says.

Although he would not elaborate, the implication is apparently that IBM sold the patents to Barracuda as a way to help the community. However, Drako would not elaborate on what price or restrictions accompanied the sale, if any.

The three patents are not among the 500 that IBM pledged in 2005 not to enforce against the free and open source software (FOSS) community.

Defensive patents, pledges and portfolios

However, whether because of the terms of sale or his own inclinations, Drako states, "Our intent is to use our patent portfolio for defensive purposes. I'm pretty aligned with other folks in the industry who believe that patents should only be used for defensive purposes. I believe that Red Hat and Sun are in that camp as well. I didn't want to do this, okay? But I have no choice because otherwise I've got a real problem with Trend Micro's suit against me."

Drako says that all revenue generated from Barracuda's patents will be donated to the community -- although not how or when.

In addition, Drako says that he is "considering" ways of reassuring the FOSS community that the patents will not be used against its project. Earlier in the case, he approached the Open Invention Network (OIN), an organization dedicated to creating a public portfolio patent. "Unfortunately,the OIN was unwilling to expand the breadth of its reach to include ClamAV, because it did not consider ClamAV part of Linux," he says.

Instead, Drako is debating whether Barracuda should create its own public portfolio for FOSS or donate its patents to some already existing public portfolio designed for the same purpose. "I haven't had time to go and investigate that, but we will be investigating that," he promises.

The new case and larger strategy

Barracuda's new claim comes as a surprise, given that a recent deposition before the ITC by Swedish developer and entrepreneur Goran Fransson included prior art that seemingly would invalidate Trend Micro's patent. And, in fact, Drako says that "the case is proceeding pretty well from Barracuda's point of view," although at this point he says he is "not ready to talk about it yet."

However, as a partial explanation of Barracuda's strategies, Drako did point out that the process is slow and time-consuming. "It's basically been discovery and discovery and discovery, going back and forth. The judge hasn't even been involved yet," he says.

Drako goes on to explain, "We're doing this to defend the open source community and to defend ClamAV, but the patent system and the way it works in the United States is very expensive for the defense, and you have to have an offence if you're going to have any hope of coming to a reasonable conclusion."

Although Drako would not elaborate on how the countersuit fits into Barracuda's legal strategy, he did make the general comment that "obviously, if we have a lawsuit against them and they have a lawsuit against us, it would be wise of both parties to come to the negotiating table and settle their dispute."

"I'm thinking of a football analogy," he concludes. "You can have the best defensive team on the field ever, but if you don't have an offense, you're not going to win the game. So we have to have an offense on the field. We've been forced to do this, even though we don't really want to be in an offensive mode."

Sunday, July 6, 2008

Portrait: Louis Landry of Joomla! finds direction in FOSS

For Louis Landry, a member of the core team for the Joomla! management system, free and open source software (FOSS) is not just a hobby, nor just the technology behind Jxtended, the consulting business in which he is a partner. For Landry, FOSS is also the movement that gave him direction in life, and provides both the rationale and the outlet for his diverse interests. In fact, he is so enthusiastic about FOSS that he sounds like an evangelist for the community whenever it is mentioned.

PortraitsPortraits

Landry's discovery of Joomla! came at a critical time in his life. In 2004, Landry graduated with a computer science degree from Louisiana Tech, and, like many graduates, faced the problem of what to do next.

"I was relatively lost in the job search," he admits. "I was at the end of an interview process with NASA, and I had worked in many different places, but I really didn't know what to do. It was getting to the point that I was just going to accept whatever I got."

Louis LandryLouis Landry

Then, in the middle of this personal crisis, Hurricane Katrina hit Landry's home city of New Orleans. Overwhelmed and directionless, he says that "I just decided that I was going to spend as much time as I could on something I could change. I'd been working with Joomla! way before when it was Mambo, and I just kept focusing and focusing and focusing as a way of dealing with everything. It was really to keep my mind on something positive, where I could make effective changes."

Landry began submitting patches throughout Joomla! Before long, he realized that he was not only keeping occupied, but "doing more and meeting more people, and having a blast. The next thing I know, I'm on the core team."

Landry found a strong enthusiasm for FOSS. "I love the people, the relationships that you make. I do love coding, but it's not my principal love. I didn't really start programming until I got to college, so it's not something I've been doing my whole life. I really enjoy the interaction, and all the new people you meet. I mean, I talk to people from all over the world, on four different continents, every day. It's amazing to be able to do that, and all the things that make open source so much fun."

So far as Landry is concerned, even Jxtended, the company he founded with other members of the Joomla! and PHP community, is an extension of his Joomla! activity. "It's a way of spending as much time as I can with the project I love and getting paid for it," Landry says. "I feel incredibly fortunate for me to be able to do what I've been doing. I'm certainly not a wealthy man, but I've made enough to be able to support myself and to keep doing what I love, and there's not a whole of people out there that get to say that they're doing exactly what they want to do. I'm really grateful."

Community and flexibility

One of the reasons that Landry is such a FOSS enthusiast is that Joomla! is such a large project that it has given him the chance to work in a number of different areas. "My education was very well-rounded," he says. Besides computer science, "I also had concentrations in history and lots of other things. And my mother was an art teacher, so I come from a very creative background. I'm not a typical programmer in that sense."

Given this love of diversity, it is not surprising that, although Landry's contributions started with programming, they soon branched out. "I'm involved in so many pieces of the puzzle," he says, including building infrastructure for the project, as well as Web pages and his current role as the coordinator of communications on the core team.

Last year, Landry had the chance to broad his horizons further when he became project manager for the core team -- "the very center of the hub," as he describes it. "It was a centralization role. I filled in the gaps and made sure that everybody had what they needed. If somebody had issues with something not getting done, or there was a problem somewhere, I was the center of operations, so it came to me. I was basically acting as a facilitator and mediator.

"Here I am, 28 years old," he marvels, "and I get the opportunity to do all that in a corporate structure. I mean, it's not a corporation, for sure, but we've got this huge, massive community with layers and layers to the thing. It was a totally humbling experience, and an honor to be at the center of things. I certainly made my share of mistakes, but it was a lot of fun."

From these personal experiences, Landry has extrapolated the theory that the ability of FOSS projects to build a strong community rests in their ability to involve as many people as possible in as many aspects of the project as possible. "It's like, if I was still in development, I would get burned out and disinterested," he says. "So we move around, and that helps us because we all understand each other's jobs. One of the things we try to do is make sure that everybody is capable of stepping in and playing a role in whatever part of the project that needs help."

This approach also has the advantage of giving a project what Landry, borrowing a term from Google, calls a high bus factor -- "that is, how many people have to be hit by a bus before things won't get done. We try to keep that number as high as possible," Landry says.

To that end, Joomla! has not only encouraged people to contribute in a number of areas but also developed structures like its cookie jar for documentation, which lists a number of small, discrete tasks that one person can do without investing a lot of effort. "That's a concept that we try to use in a lot of areas," Landry says, adding that it tends to reduce the anxiety that people have when trying a new tasks. "The cookie jar is a way for us to say, 'Here are things that we know we'd like to see done, and anyone can pick them up.'" It is largely because of this attitude, Landry suggests, that Joomla! is "one of the best projects I've seen about opening up to non-developers."

Communication and planning

When I talked to Landry at the recent Vancouver Joomla!Day, he had just returned from the annual core team meeting in Germany. While many of the details of the decisions made on the summit still have to be worked out, Landry says that the purpose of the summit was planning for the continued growth of the project.

"We've got to regroup a lot of our structures so that we can better manager the group, and we need to add some new people at the leadership level," says Landry. "But it was really about making sure that everybody continues to have the ability to do their job the best they can without getting inhibited by structure, and lowering the barrier to get things done."

As for Landry himself, communications and organization are satisfying for the time being. "I don't know how I'll feel about things in the future. But I will do the best I can to ensure that when I get sick of everything, there'll be somebody else to step in."

He does not even rule out the possibility of moving on from Joomla! "I do have other ambitions," he admits. "I think that, for the foreseeable future, Joomla! works for me. But we'll see."

Speaking both for himself and the project, Landry concludes, "Our greatest success has been to enable people. That's something that really excites me about this project: Our ability to bring people in and grow the project organically from the ground up. I think that's one of the reasons I love open source so much."

Saturday, July 5, 2008

Expert tip: Print booklets in Scribus

Scribus, a free, open source desktop publishing application, offers a wide range of page layout features, but one thing it lacks is the ability to print booklets. Fortunately, I've come across a simple procedure that lets you work around this issue. Here's how to do it in Linux; Windows users should be able to follow along too.

First, you need to determine the size of the paper you're using and the size of the document you want to create. I'm in Europe, so I generated A5-sized booklets using A4 sheets. In the US, if you want to prepare a booklet with letter-sized sheets, you must set the Scribus document size to half the letter size -- in other words, 5 1/2 x 8 1/2 inches. In both cases, the orientation must be vertical.

Next, enter text into your Scribus document. Don't forget to put in page numbers if you need them (see the tutorial for details).

When you're ready to print your booklet, convert it to PDF format and put it in an easy-to-remember location, because you must open it immediately with Evince, the standard PDF viewing application, and go to File -> Print to open the Print dialog. In the General tab, set the number of copies you want, and if it's not grayed out, check the Collate checkbox.

You must set "Print Pages" to Range so that the pages print in a particular order. That way, your booklet will be ready without you having to use scissors and glue. To get the correct page order for a generic n-paged booklet, where n is a multiple of 4, follow this order:

n, 1, 2, n-1, n-2, 3, 4, n-3, n-4 ...

The following list shows some examples:

  • 4-page booklet: Enter 4, 1, 2, 3.
  • 8-page booklet: Enter 8, 1, 2, 7, 6, 3, 4, 5.
  • 12-page booklet: Enter 12, 1, 2, 11, 10, 3, 4, 9, 8, 5, 6, 7.
  • 16-page booklet: Enter 16, 1, 2, 15, 14, 3, 4, 13, 12, 5, 6, 11, 10, 7, 8, 9.

Next, go to the Page Setup tab and set Pages Per Side to 2. If your printer driver permits it, enable Two-Sided to print onto both sides of the sheets. Click Print, and your booklet will go to your printer.

Instead of exporting to PDF and printing with Evince, you could try printing the appropriate range directly from Scribus. However, the version I have installed, 1.3.3.11, is not yet able to manage this correctly.

Using free software, you can now produce beautiful booklets with ease.

Friday, July 4, 2008

A new utility for quickly interpreting multiple Bonnie++ benchmarks

Yesterday I discussed the Bonnie++ tool, which can be used to benchmark filesystem performance. When you are tweaking a RAID and filesystem combination, you generally want to see whether your changes work in a positive manner across the board, and by how much. I created a utility called bonnie-to-chart to show the results of multiple Bonnie++ runs in either absolute or relative performance terms. It's primarily a Perl script that can be used together with the Open Flash Chart component.

Bonnie-to-chart can report results in absolute terms, showing multiple benchmarks on a single graph, allowing you to see the absolute KB/sec throughput of each benchmark run. It also provides a relative mode, where you run a single "baseline" benchmark on a system in a default or current state, modify the system, and rerun Bonnie++. You can then quickly compare the results of the two Bonnie++ runs, seeing the results of the subsequent runs not in terms of raw KB/sec but in terms of how much more or less KB/sec each run achieves relative to the baseline benchmark.

The main requirements of bonnie-to-chart are the Perl modules CGI and Text::CSV_XS. You will also need to download Open Flash Chart. The bonnie-to-chart distribution tarball includes bonnie.csv, index.php, and chart-data.cgi.

You must install the software by hand by expanding the bonnie-to-chart tarball and selecting the required parts out of an Open Flash Chart tarball. Here I install bonnie-to-chart under my WebRoot (/var/www/html) in the bonnie-to-chart subdirectory:


# cd /var/www/html
# mkdir bonnie-to-chart
# tar xzvf /T/bonnie-to-chart.001.tar.gz
# cd bonnie-to-chart
# mkdir tmp
# cd tmp
# unzip /T/open-flash-chart-1.9.7.zip
# mv open-flash-chart.swf ..
# mv php-ofc-library ..
# mv perl-2-ofc-library/
# mv perl-2-ofc-library/open_flash_chart.pm ../cgi-bin/
# cd ..
# rm -rf tmp
# cd /var/www/html/
# chown -R ben.apache bonnie-to-chart
# chmod +s bonnie-to-chart

You also need to tell Apache that the cgi-bin directory contains files that should be executed rather than downloaded from the Web server by adding a ScriptAlias to your httpd.conf file, as shown in bold below:


# vi /etc/httpd/conf/httpd.conf
...
ScriptAlias /cgi-bin/ "/var/www/cgi-bin/"
ScriptAlias /bonnie-to-chart/cgi-bin/ "/var/www/html/bonnie-to-chart/cgi-bin/"
...

Running some benchmarks

Click to enlarge It is convenient to run Bonnie++ from a shell script that varies one or more parameters and benchmarks each configuration. The script below is an example that I used to benchmark the performance of RAID-5 and RAID-6 on six drives with various chunk sizes. A parity RAID like RAID 5 or 6 is divided into chunks as logical building blocks. As a concrete example, if you are using RAID-5 on six disks, with a chunk size of 64KB (the default for such RAIDs created with mdadm), then the first 64KB chunk is written to the first drive, the second 64KB to the second drive, the fifth to the fifth, and the parity to the sixth drive. These six chunks make up a single stripe on the drive. When writing the second stripe on the disk, the chunks move down a slot, so the first chunk is written to the second disk, the second chunk to the third disk, and so on, with the parity being written to the first disk for the second stripe. Sometimes for reporting the number of disks in a stripe, the number of disks that are used for parity are not counted, so the six-disk RAID-5 has a stripe size of five because conceptually one disk is used purely for parity.

The script shown below assumes that all the partitions listed in DISK_PARTITIONS can be completely destroyed and used for testing RAID performance. The two driving lists in the script are those in the RAIDLEVEL and CHUNK_SZ_KB for loops. For each RAID-5 and RAID-6 the performance of a selection of chunk sizes is tested. For each RAID and chunk size many different filesystems are created in different ways.

The alignment of data in the filesystem to chunk boundaries can have a profound impact on the performance of the filesystem. Some edge cases arise when dealing with journaling filesystems and how to best handle writing the journal data as the chunk size increases.

The Bonnie++ benchmarks are appended to bonnie.csv in your home directory. To make these available to the bonnie-to-chart Web application, copy them to /var/www/html/bonnie-to-chart/bonnie.csv.


#!/bin/bash

cd /dev/disk/by-id

DISK_PARTITIONS="/dev/disk/by-id/scsi-SAdaptec_dev*part1"
TOTAL_DRIVE_COUNT=$(echo $DISK_PARTITIONS | tr ' ' '\n' | wc -l);

for RAIDLEVEL in 5 6
do
PARITY_DRIVE_COUNT=$(( $RAIDLEVEL-4 ));
NON_PARITY_DRIVE_COUNT=$(( $TOTAL_DRIVE_COUNT - $PARITY_DRIVE_COUNT ));
echo "Tesing RAID:$RAIDLEVEL which has $NON_PARITY_DRIVE_COUNT parity drives..."

for CHUNK_SZ_KB in 4 8 16 32 64 128 256 1024 4096
do

STRIDE_SZ_KB=$((CHUNK_SZ_KB/4));
echo "Testing CHUNK_SZ_KB:$CHUNK_SZ_KB STRIDE:$STRIDE_SZ_KB"
mdadm --create --run --verbose -e 1.2 --auto=md --verbose /dev/md-tmpraid \
--level=$RAIDLEVEL --raid-devices=$TOTAL_DRIVE_COUNT \
--chunk=$CHUNK_SZ_KB \
$DISK_PARTITIONS
sleep 1;
echo "Waiting for RAID to reshape..."
mdadm --wait /dev/md-tmpraid
sleep 1;

fsdev="raid${RAIDLEVEL}_chunk${CHUNK_SZ_KB}_ext3";
mkfs.ext3 -F -E stride=$STRIDE_SZ_KB /dev/md-tmpraid
mkdir -p /mnt/tmpraid
mount -o data=writeback,nobh /dev/md-tmpraid /mnt/tmpraid
chown ben /mnt/tmpraid
sync
sleep 1
echo "benchmarking $fsdev..."
sudo -u ben /usr/sbin/bonnie++ -q -m $fsdev -n 256 -d /mnt/tmpraid >>~/bonnie.csv
umount /mnt/tmpraid


fsdev="raid${RAIDLEVEL}_chunk${CHUNK_SZ_KB}_xfs";
mkfs.xfs -f -s size=4096 \
-d sunit=$(($CHUNK_SZ_KB*2)),swidth=$(($CHUNK_SZ_KB*2*$NON_PARITY_DRIVE_COUNT)) \
-i size=512 \
-l lazy-count=1 \
/dev/md-tmpraid
mkdir -p /mnt/tmpraid
mount -o nobarrier /dev/md-tmpraid /mnt/tmpraid
chown ben /mnt/tmpraid
sync
sleep 1
echo "benchmarking $fsdev..."
sudo -u ben /usr/sbin/bonnie++ -q -m $fsdev -n 256 -d /mnt/tmpraid >>~/bonnie.csv
umount /mnt/tmpraid


fsdev="raid${RAIDLEVEL}_chunk${CHUNK_SZ_KB}_xfslogalign";
mkfs.xfs -f -s size=4096 \
-d sunit=$(($CHUNK_SZ_KB*2)),swidth=$(($CHUNK_SZ_KB*2*$NON_PARITY_DRIVE_COUNT)) \
-i size=512 \
-l lazy-count=1,sunit=$((CHUNK_SZ_KB*2)),size=128m \
/dev/md-tmpraid
mkdir -p /mnt/tmpraid
mount -o nobarrier /dev/md-tmpraid /mnt/tmpraid
chown ben /mnt/tmpraid
sync
sleep 1
echo "benchmarking $fsdev..."
sudo -u ben /usr/sbin/bonnie++ -q -m $fsdev -n 256 -d /mnt/tmpraid >>~/bonnie.csv
umount /mnt/tmpraid

mdadm --stop /dev/md-tmpraid
sleep 1;
done

done

The core script of bonnie-to-graph is cgi-bin/chart-data.cgi. At the top of chart-data.cgi are some definitions you can change for the colors used for the bars and the CSS used for the graph title. The read_bonnie_csv function handles parsing the Bonnie++ comma-separated file from the input file, which is /var/www/html/bonnie-to-chart/bonnie.csv by default as defined toward the top of chart-data.cgi. read_bonnie_csv also handles converting the benchmark results into numbers relative to the first benchmark result if the relative CGI parameter is present. Another CGI parameter that is accepted is metadata, which causes the script to create the graph of metadata operations rather than the default block IO benchmarks. The chart-data.cgi script ends by looping over all the Bonnie++ benchmark results loaded by read_bonnie_csv and creating a bar for each result that should be shown (either block IO or metadata) and setting appropriate minimum and maximum axis values.

Results

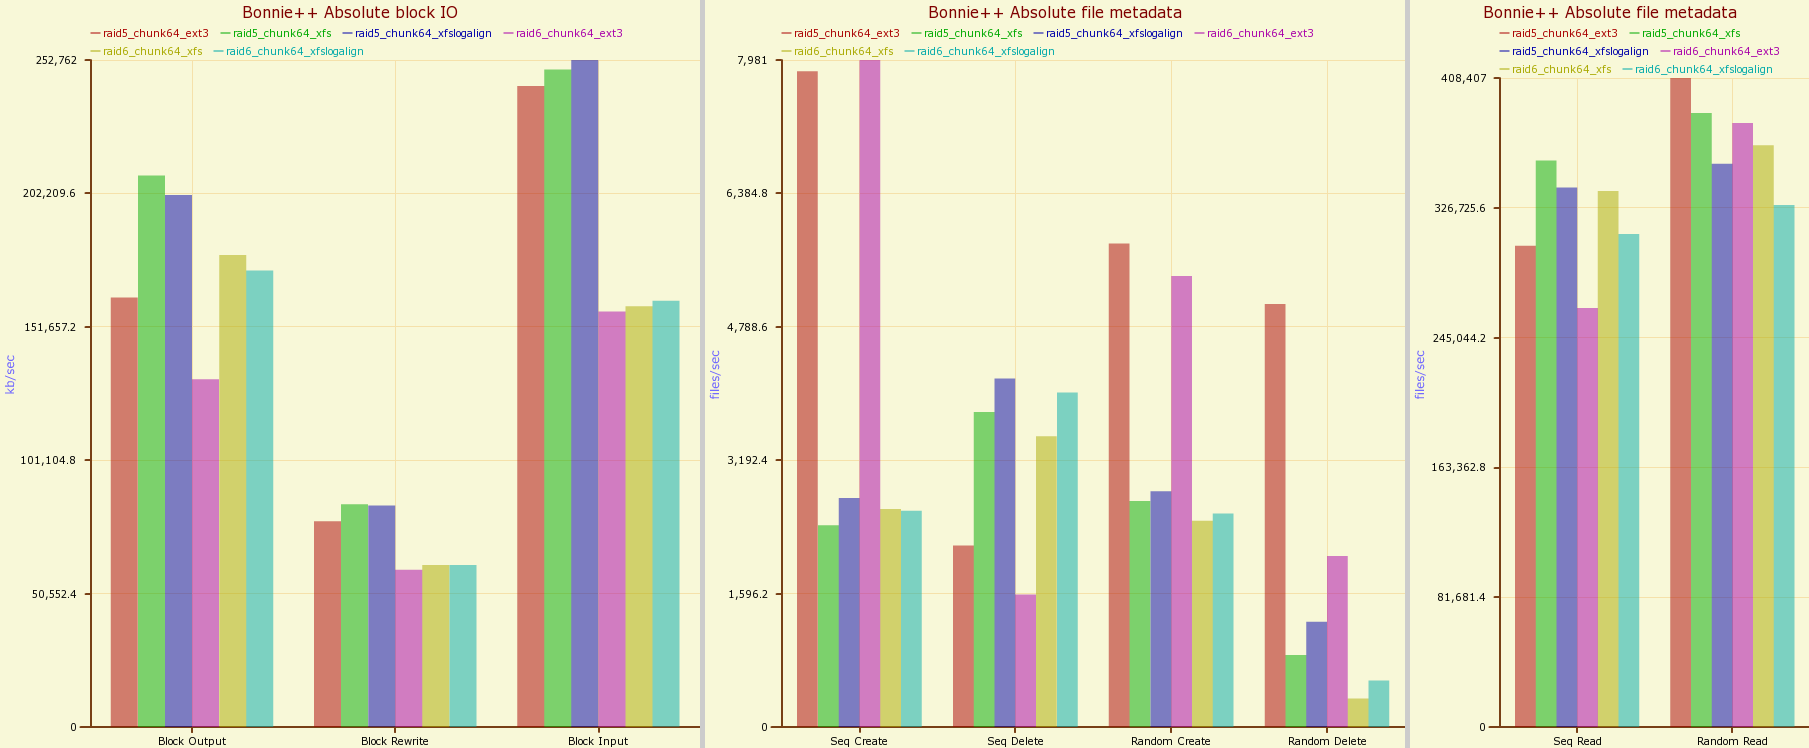
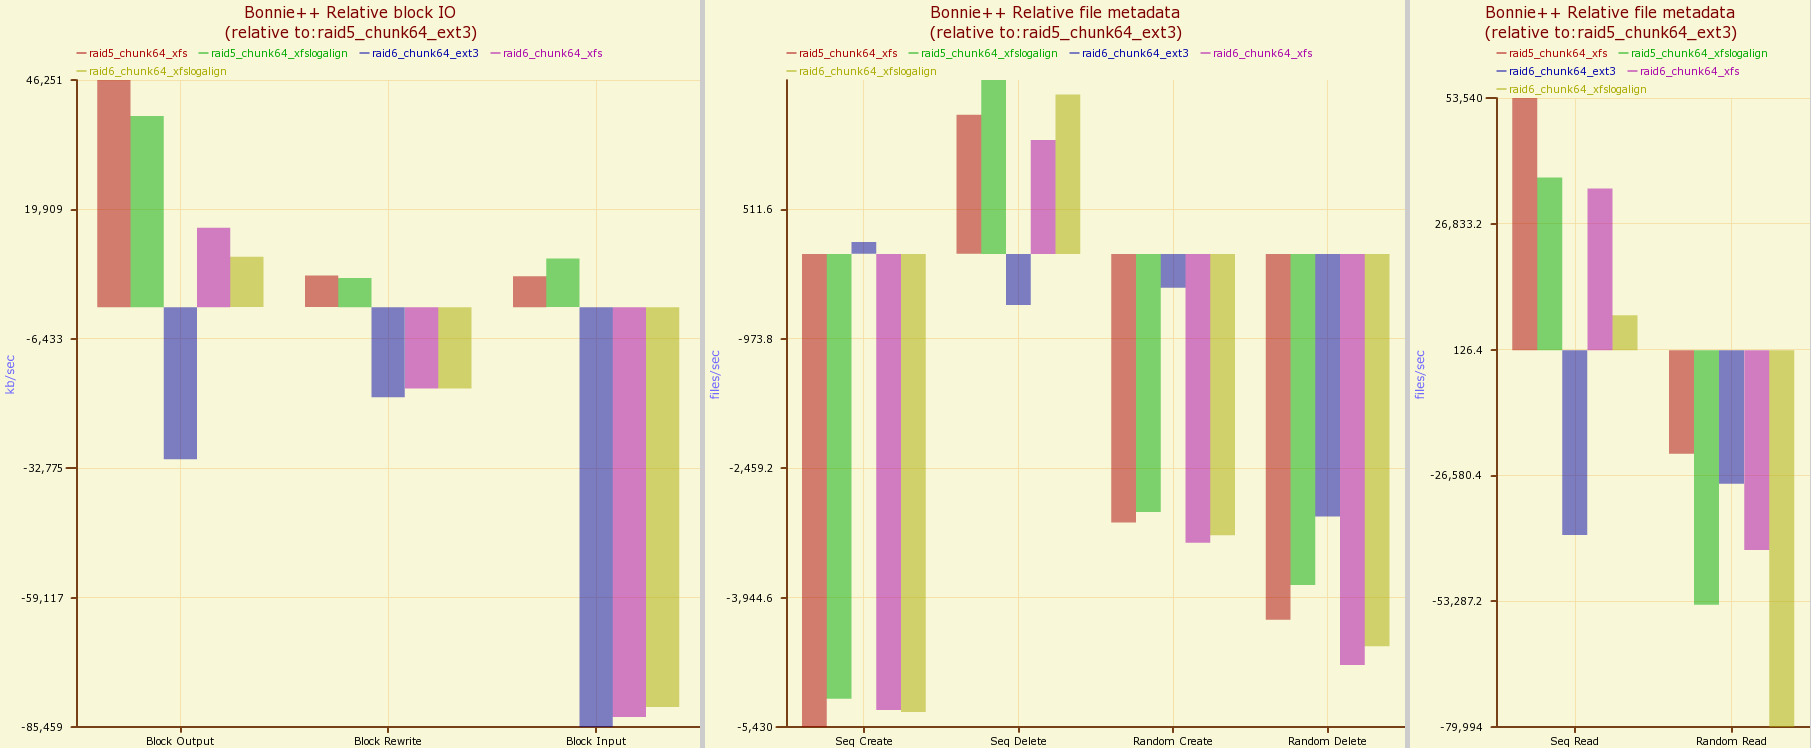
Click to enlarge The results are presented as figures either reporting absolute figures or performance relative to the first result in bonnie.csv. In relative reporting mode, the first result itself is not reported because it will always be zero for each benchmark. Presenting results in a relative manner allows you to quickly see whether your filesystem modifications are giving you positive performance, and which from a group is the best choice. Relative mode is great if you are running benchmarks on the same hardware, just tweaking filesystem or RAID configuration, because you are less likely to care about the exact throughput and more about how your changes affect the benchmark.

The results of running a 64KB chunk size on RAID-5 and RAID-6 using ext3 and two XFS setups are shown below. It took about 1.5 hours to complete all of the Bonnie++ runs for the 64KB chunks size. You can see from the absolute graph that software RAID-6 gives a huge drop in rewrite and input performance but does not affect block output as severely. The baseline for the relative graph is ext3 running on RAID-5. You can easily see from the relative graph that XFS running on RAID-6 is actually faster for block output than ext3 running on RAID-5 on the benchmark hardware.

The relative graph is much more informative for displaying the Bonnie++ metadata operation benchmarks. The ext3 configurations handle sequential and random create operations much more efficiently than XFS. Of particular interest is the difference on the relative graph between the xfs and xfslogalign datasets. By stripe-aligning the XFS journal log for the xfslogalign filesystem, the relative performance of logalign is better than the defaults that mkfs.xfs chose for this filesystem. What might not have been quite as expected is that this change in the journal alignment also drops block output performance while increasing block input performance.

The bonnie-to-chart project is still in its infancy. I hope to support more graphing packages in the future and include a selection of scripts that can execute Bonnie++ for you. At the moment the script to run Bonnie++ presented about is very rough and unforgiving.